Write Your Own Arduino Library

As we have seen while using Arduino, it never runs off by its library support! Whatever library you want at an instance, you can find that, by just using some relevant keyword while using the search engine. But through our experience we are telling, its not always that you will able to fine the library file you want to, use for your project. Or even if you found one, it will not be working!
Write Your Own Arduino Library
So in that case you have to write your own library. Like in our case, we were trying to interface the resistive touch scren with our Arduino MEGA board, we searched a lot over the internet, & got 2 versions of library for the same, but they were obsolete, & not working! So decided to write our own library get input from touchscreen to Arduino board
The same situation can happen with you also! So our recommendation is that you should  know "How to write Arduino Library?" 

So lets Start......
General Intro
Libraries are files written in either C or C++ (.c, .cpp) which provide your sketch/source code with extra or common functionality. They have a file extension of .h.
To use an pre-built/existing library in your Arduino Program simply go to the "Sketch" menu, choose "Import Library", and pick from the libraries available.
That will insert an #include statement at the top of the sketch/program along with the imported header file. These statements make the public functions and constants defined by the library available to your sketch. They also signal the ArduinoIDE  to link that library's code(Linking operation) with your program/code when it is compiled or uploaded.
Because libraries are uploaded on board with your sketch/program, they increase the amount of space used by the ATmega8 on the board. If you no longer need a particular library, simply delete its #include statements from the top of your code. This will stop the Arduino IDE from linking the library & decrease the amount of space used on the Arduino board. 

1st step: The basic sketch for the library is writen....
Its just like making boundaries before filling up the colors in the canvas! Later from this we will be making the required library.
So my code will look like this....

#include<xyz.h> //The custom made library as we want to name it 

xyz abc; //declaring a xyz class object abc

void setup()
{
   abc.initial(); //initializing with the option provided in the class definition
}
void loop()
{
  abc.proceed(); //things to at every loop iteration
}
 
So looking at above code, function initial() is for initializing the variables(ports etc.) and proceed() function for do some operational work at each looping cycle.
Now make a list what all going to need, all the input parameters you need, and also output params. also.....
Now its time to step up for writing our own Arduino Library for the above needed operation....
Arduino may be build up in JAVA, but its programing syntax is very similar to C++.

2nd step:
To build the library you are required to create two files, one with extension .h & other .cpp.
In the .h(Header file), you need to write as the following....
 
// ensure this library description is only included once
#ifndef Testing_h
#define Testing_h
// include types & constants of Wiring core API
#include "WConstants.h"
//Start of definition of class xyz
class xyz {
public:      //public declared variables & functions, accessible outside of the class
                      //the class constructor
xyz();              //Default constructor of class xyz, may contain anything for initializing object 
void initial();    //define your first function here
void proceed();//define your second function here
private:           //private declared variables & functions, accessible inside the class
int input_process(); //to process and draw conclusion from input
int callibrationdata(int n=0); //you might want to calibrate your device
};                   //end of class xyz definition 
#endif
//ending with end if
 
3rd step: 
Save the above code with an extension ".h". It will become your header file.
Next step is to write you own .cpp file, it will contain the main() function,
which is the driver function in a C++ program.
It will look like as...
#include<xyz.h>     //including the custom made header file
xyz::xyz()
{                            //calling the default constructor

}
void xyz::initial()
{                            //the body of initial() function
                              //setup your sensor here
}
void xyz::proceed()
{                            //the body of the proceed() function
  int input_data= input_process();
  int output=callibrationdata(input_data);
}
int xyz::input_process()
{
                             //analogRead or equivalent or whatever you need to do
}
int ExampleLib::fancyAlgorithm(int inputData)
{
                            //some complex stuff
}
 
Save it as .cpp extension.
Take both these files...(.cpp & .h) under one folder, and your own custom made library
is ready!
To install it, in your Arduino IDE go to arduino root folder in my case it is
"E:\arduino-1.0.1"


Open Libraries Folder and paste it, now you will be able to use your own custom made 
Arduino library by going to "Sketches" then selecting the "Import Library" option,
then selecting the library you hae just created.
HAPPY CODING :)


How To Install Arduino IDE

How to Install the Arduino IDE for Windows
Arduino
Without the IDE, You cant program your arduino!  So, how  you are going install the Arduino IDE? These instructions will help you out

Step 1:

How to Install the Arduino IDE for Windows

  1. Go to http://www.arduino.cc. Download the latest Software.

Step 2:
**Do the extraction of Arduino IDE, to your desired location, may be Desktop, may be in the program file or any other location as you want it!
**Best practice is to extract it, and make a shortcut of "arduino.exe" And CUT-PASTE it on desktop.


Step 3: 


  • **Plug in the Arduino to your computer using the USB cable. 

  • **It will fail to install automatically despite its best try. 

  • **Go to Start > Control Panel > System and Security > Device Manger. Or Right Click on "My Computer", and click on Manage.

  • **Computer Management window will be appearing, then from the left menu click on "Device  Manager"

  • **Under COM/LPT port section, u will find the board you have connected, may be MEGA, UNO etc.

  • **Right Click > Update Driver Software > Browse. 

  • **Then browse for the arduino software in C: Program Files/Arduino/drivers. or where ecevr oyu have extracted it...go to  ..../Arduino/drivers then click select(or something like that.

  • **Now the automatic installation of Arduino Begun.

  • **Click "Ok" and you are done with installation of your arduino board.


Step 4: 


  • **Click on the shortcut you made earlier or double-click on "Arduino.exe" from the folder you have extracted the IDE. 

  • **Go to Tools > Serial Port > then use what ever COM port you're using. (You can check  the device manager > COM port. Click on ones until you find yours.) 

    **Select what arduino board you're using 


    Step 5:


    **Keep the arduino plugged in so that you can program it. Go to Files > Examples > Basics > Blink. Once you have that done, press the reset button on the arduino. Click upload. And if all went well, you should see the "done uploading" on the bottom of the IDE.


    If You Have Followed The Above Step You Have Successfully Installed and Configured The Arduino IDE.


Comparision: Arduino Uno, Rev2 and Rev3 Boards

This article list the differences that are in the previous Arduino UNO boards & the currently available Arduino UNO board, i.e., REV 3.

Hope you will find this Comparision interesting!

USB Chip Position

"ATMEGA8U2" is positioned at 45 degrees in the 2nd board (Arduino UNO Rev 2). Changed back to 90 degree on the Revision 3 board.

USB Chip ( ATMEGA8U2) Alignment Comparison

Solder Pads

Both Rev 2 & 3 boards add 4 solder pads (JP2) connecting to pins PB4 to PB7 of the "ATMEGA8U2".
Solder Pad Similarities Between Rev 2 & 3


IC Number

The Arduino Uno and Arduino Uno Revision 2 both have an ATMEGA8U2 USB microcontroller onboard but this is upgraded to an ATMEGA16U2 on the Rev 3 board.

Reset Circuit

REV 3 adds a diode parallel to the USB ATMEGA16U2 reset pin pull-up resistor, which was not in the previous 2 Arduino UNOs.


A diode parallel to the USB ATMEGA16U2 reset pin pull-up resistor

ICSP Header

Rev 2 & 3 boards are both supplied with header pins in the USB ATMEGA ICSP header rather than just solder pads in the Arduino Uno (initial version).

Rev 2 & 3 boards are both supplied with header pins in the USB ATMEGA ICSP header rather than just solder pads in the Arduino Uno (initial version).

Pin Connectors

The REV3 board have changes from the 8 pin connector to 10 Arduino pin connector, containing digital pins numbering 8 to 13, GND and AREF for a 10 pin connector. There are the 2 analog input  pins als that can be used for I2C.
Revision 3 boards also change the 6 pin connector that has the reset pin to an 8 pin connector.
One of the new pins on this header is the IOREF that allows shields connected to the board to adapt to the voltage required. One more pin is reserved for future use.

Differences Between Arduino UNO, R2 & R3 Pin Headers

Arduino IDE (Arduino Programming Software)

Arduino IDE, Version 1.0.1, With Teensy 2.0 Connected

Arduino Interactive Development Environment

The Arduino IDE contains a text editor for writing code, a notification area, a toolbar with buttons for necessary functions, and menus. It used to write Arduino code and upload it to the board.

Writing Programs/Sketches

Source Code written using Arduino are called sketches. These sketches may be written in the text editor. And are saved with the file extension .ino. It has features for cutting/pasting and for searching/replacing text. The notification area gives feedback while verifying, saving and uploading and also displays errors. The console displays text output by the Arduino environment including complete error messages and other info. The bottom righthand corner of the window displays the current board and serial port. The toolbar buttons allow you to "verify" and "upload" programs, "create", "open", and "save" sketches, & to open the serial monitor.

Note: Versions of the IDE prior to 1.0 saved sketches with the extension .pde. It is possible to open these files with version 1.0, you will be prompted to save the sketch with the .ino extension on save.
 
Verify
Compiles your source Code & look for errors in it. If any error is indicated it will display it in the message section.

Upload
Compiles your code and uploads it to the Arduino I/O board.
Importnant Note: If you are using an external programmer, you can hold down the "shift" key on your computer when using this icon. The text will change to "Upload using Programmer"

New
Creates a new source code/sketch.

Open
Presents a menu of all the code/sketches in your text editor(Arduino sketchbook). Clicking one will open it within the current window.
Note: due to a bug in Java, this menu doesn't scroll; if you need to open a sketch late in the list, use the File | Sketchbook menu instead.

Save
Saves your code/sketch in .pde or .ino format.

Serial Monitor
Opens the serial monitor to see all the serial communication activity at a particular BAUD rate.

Additional commands are found within the five menus: File, Edit, Sketch, Tools, Help.

Edit

  • Copy for Forum
    Copies the code of your sketch to the clipboard in a form suitable for posting to the forum, complete with syntax coloring.
  • Copy as HTML
    Copies the code of your sketch to the clipboard as HTML, suitable for embedding in web pages.

Sketch

  • Verify/Compile
    Checks your sketch for errors.
  • Show Sketch Folder
    Opens the current sketch folder.
  • Add File...
    Adds a source file to the sketch (it will be copied from its current location). The new file appears in a new tab in the sketch window. Files can be removed from the sketch using the tab menu.
  • Import Library
    Adds a library to your sketch by inserting #include statements at the code of your code. For more details, see libraries below.

Tools

  • Auto Format
    This formats your code nicely: i.e. indents it so that opening and closing curly braces line up, and that the statements inside curly braces are indented more.
  • Archive Sketch
    Archives a copy of the current sketch in .zip format. The archive is placed in the same directory as the sketch.
  • Board
    Select the board that you're using. See below for descriptions of the various boards.
  • Serial Port
    This menu contains all the serial devices (real or virtual) on your machine. It should automatically refresh every time you open the top-level tools menu.
  • Programmer
    For selecting a harware programmer when programming a board or chip and not using the onboard USB-serial connection. Normally you won't need this, but if you're burning a bootloader to a new microcontroller, you will use this.
  • Burn Bootloader
    The items in this menu allow you to burn a bootloader onto the microcontroller on an Arduino board. This is not required for normal use of an Arduino board but is useful if you purchase a new ATmega microcontroller (which normally come without a bootloader). Ensure that you've selected the correct board from the Boards menu before burning the bootloader.

Sketchbook

The Arduino environment uses the concept of a sketchbook: a standard place to store your programs (or sketches). The sketches in your sketchbook can be opened from the File > Sketchbook menu or from the Open button on the toolbar. The first time you run the Arduino software, it will automatically create a directory for your sketchbook. You can view or change the location of the sketchbook location from with the Preferences dialog.

Tabs, Multiple Files, and Compilation

Allows you to manage sketches with more than one file (each of which appears in its own tab). These can be normal Arduino code files (no extension), C files (.c extension), C++ files (.cpp), or header files (.h).

Uploading Your Source Code

Before uploading your sketch, you need to select the correct items from the Tools > Board and Tools > Serial Port menus.
The boards are described below.
On the Mac, the serial port is probably something like /dev/tty.usbmodem241 (for an Uno or Mega2560 or Leonardo) or /dev/tty.usbserial-1B1 (for a Duemilanove or earlier USB board), or /dev/tty.USA19QW1b1P1.1 (for a serial board connected with a Keyspan USB-to-Serial adapter).
On Windows, it's probably COM1 or COM2 (for a serial board) or COM4, COM5, COM7, or higher (for a USB board) - to find out, you look for USB serial device in the ports section of the Windows Device Manager.
On Linux, it should be /dev/ttyUSB0, /dev/ttyUSB1 or similar.
Once you've selected the correct serial port and board, press the upload button in the toolbar or select the Upload item from the File menu.
Current Arduino boards will reset automatically and begin the upload. With older boards (pre-Diecimila) that lack auto-reset, you'll need to press the reset button on the board just before starting the upload.
On most boards, you'll see the RX and TX LEDs blink as the sketch is uploaded.

The bootloader is active for a few seconds when the board resets; then it starts whichever sketch was most recently uploaded to the microcontroller. The bootloader will blink the on-board (pin 13) LED when it starts (i.e. when the board resets).

Libraries

Libraries provide extra functionality for use in sketches, e.g. working with hardware or manipulating data. To use a library in a sketch, select it from the Sketch > Import Library menu. This will insert one or more #include statements at the top of the sketch and compile the library with your sketch. Because libraries are uploaded to the board with your sketch, they increase the amount of space it takes up. If a sketch no longer needs a library, simply delete its #include statements from the top of your code.
There is a list of libraries in the reference. Some libraries are included with the Arduino software. Others can be downloaded from a variety of sources.

Third-Party Hardware

Support for third-party hardware can be added to the hardware directory of your sketchbook directory. Platforms installed there may include board definitions (which appear in the board menu), core libraries, bootloaders, and programmer definitions. To install, create the hardware directory, then unzip the third-party platform into its own sub-directory. (Don't use "arduino" as the sub-directory name or you'll override the built-in Arduino platform.) To uninstall, simply delete its directory.
For details on creating packages for third-party hardware, see the platforms page on the Arduino Google Code developers site.

Serial Monitor

Displays serial data being sent from the Arduino board (USB or serial board). To send data to the board, enter text and click on the "send" button or press enter. Choose the baud rate from the drop-down that matches the rate passed to Serial.begin in your sketch. Note that on Mac or Linux, the Arduino board will reset (rerun your sketch from the beginning) when you connect with the serial monitor.

Preferences

Some preferences can be set in the preferences dialog (found under the Arduino menu on the Mac, or File on Windows and Linux). The rest can be found in the preferences file, whose location is shown in the preference dialog.
Courtsey: arduino.cc
Click Here to view information about all other official Arduino boards available in the market.

Robotic Surgery-A Tech Student Viewpoint


Introduction [Brief History]

  • *** The term “robot”  is actually coined by Karel Capek , a Czech playwright in his play Rossum’s Universal Robots in 1921.
  • *** In 1985 a robot ,Puma 560 was used to place a needle for a brain biopsy using CT (Computed Tomography) guidance .
  • ***First Laproscopic surgery was perfomed in 1987 (laproscopic surgery involves operations within the abdominal or pelvic cavities).


So What do you mean by a robotic surgery?
Robotic surgery is a surgery in which the surgeon performs surgery b manipulating the hands of a robot  or any mechanical device that operates automatically with human like skills.


Types of robots In Surgery
    **Active
**   Re-tractor system
**    Position the tool and then hold
In this type of robot the tool is moved under surgeon command.the tool is used to hold devices such as blades, bieves etc.

 **Passive
In this type of robot the tool as well as the fingers are moved by surgeons command, the fingers are moved as per command to perform the surgery.


Da-Vinci robot
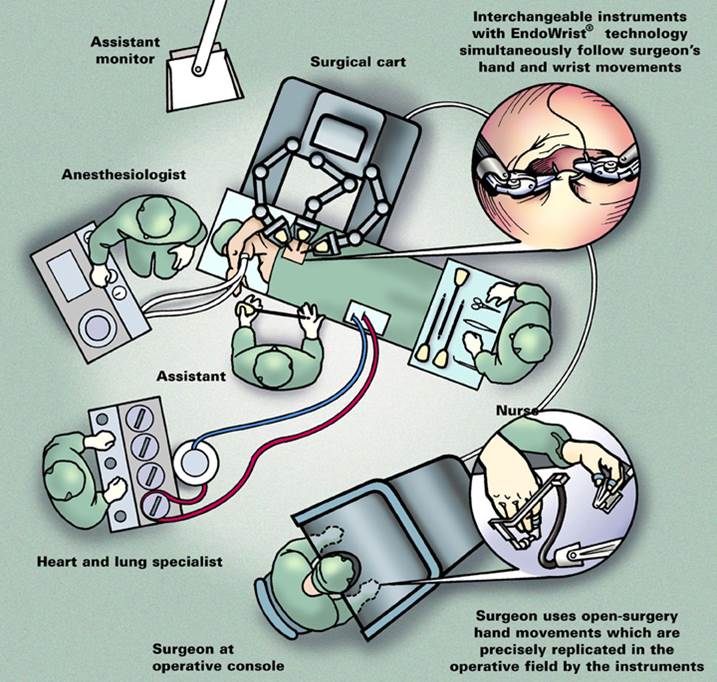
   A robotic  system made by an American company designed to facilitate complex surgery using a minimally invasive approach.  Costing around 2.5 million us dollars the robotic system has been used to repair cardiac  valve and for prostrate removals.the future application of Da Vinci robotic system  can be in telesurgery where a surgeon [For Example] sitting in India can perform a surgery on a patient in Antarctica.
Da vinci system schematic
Da-Vinci system schematic


Stereoscopic 3D  Vision

Stereoscopic 3D  Vision
Robotic wrist with six degrees of freedom


The robotic system consists of four interactive robotics arms controlled from the console, three of the arms are for the tool that hold objects such as scissors , bovies etc.the fourth arm carries an endoscopic camera with two lenses that gives the surgeon steroscopic vision.


Advantages of robots in surgery
Ø  Shorter hospital stay
Ø  Reduced Trauma to the body
Ø  Less anesthesia
Ø  Less Blood loss
Ø  Less post- operative pain
Ø  Less pain
Ø  Less risk of infection
Ø  Less scarring
Faster recovery and return to daily activities


Conclusions
Ø  The rate of discovery of new technology is outpacing the ability of business, society, and healthcare to integrate and apply
Ø  Robotic surgery is but one example of such technology that MAY reduce operative morbidity, hospital stay, and recovery, while POTENTIALLY improving clinical outcomes.


An Article By 
Ajay Rai
Student @ VIT