Bit Error Ratio (BER) Curve for 8-PSK (Phase Shift Keying) OFDM for Rayleigh Channel

%The bit error ratio (also BER) is the number of bit errors divided by the total number of transferred bits during a studied time interval. 
%The delays associated with different signal paths in a multipath fading channel change in an unpredictable manner and can only be characterized statistically. When there are a large number of paths, the central limit theorem can be applied to model the time-variant impulse response of the channel as a complex-valued Gaussian random process. When the impulse response is modeled as a zeromean complex-valued Gaussian process, the channel is said to be a Rayleigh fading channel.

MATLAB Code:  

close all
clear all
clc

nbitpersym  = 52;   % number of bits per OFDM symbol (same as the number of subcarriers for BPSK)
nsym        = 10^4; % number of symbols
len_fft     = 64;   % fft size
sub_car     = 52;   % number of data subcarriers
EbNo        = 0:5:30;
k=3;
EsNo= EbNo + 10*log10(52/64)+ 10*log10(64/80)+ 10*log10(k); % symbol to noise ratio

snr= EsNo - 10*log10(64/80); % snr as to be used by awgn fn.

hh = modem.pskmod('M',2^k,'InputType','Bit','SymbolOrder','gray'); % modulation object

% Generating data

t_data=randi([0 1],nbitpersym*nsym*k,1);

% modulating data

mod_data = modulate(hh,t_data);

% serial to parallel conversion

par_data = reshape(mod_data,nbitpersym,nsym).';

% pilot insertion

pilot_ins_data=[zeros(nsym,6) par_data(:,[1:nbitpersym/2]) zeros(nsym,1) par_data(:,[nbitpersym/2+1:nbitpersym]) zeros(nsym,5)] ;

% fourier transform time doamain data and normalizing the data

IFFT_data = (64/sqrt(52))*ifft(fftshift(pilot_ins_data.')).';

% addition cyclic prefix

cylic_add_data = [IFFT_data(:,[49:64]) IFFT_data].';

% parallel to serial coversion

ser_data = reshape(cylic_add_data,80*nsym,1);

% passing thru channel

h=rayleighchan(1/10000,10);

changain1=filter(h,ones(nsym*80,1));
a=max(max(abs(changain1)));
changain1=changain1./a;

chan_data = changain1.*ser_data;
no_of_error=[];
ratio=[];

for ii=1:length(snr)

chan_awgn = awgn(chan_data,snr(ii),'measured'); % awgn addition

chan_awgn =a* chan_awgn./changain1; % assuming ideal channel estimation

ser_to_para = reshape(chan_awgn,80,nsym).'; % serial to parallel coversion

cyclic_pre_rem = ser_to_para(:,[17:80]);   %cyclic prefix removal

FFT_recdata =(sqrt(52)/64)*fftshift(fft(cyclic_pre_rem.')).';    % freq domain transform

%  FFT_recdata = FFT_recdata./FFT_recdata1;

rem_pilot = FFT_recdata (:,[6+[1:nbitpersym/2] 7+[nbitpersym/2+1:nbitpersym] ]); %pilot removal

ser_data_1 = reshape(rem_pilot.',nbitpersym*nsym,1);  % serial coversion

%  ser_data_1  =  ser_data_1./abs(FFT_recdata1);

z=modem.pskdemod('M',2^k,'OutputType','Bit','SymbolOrder','gray'); %demodulation object

demod_Data = demodulate(z,ser_data_1);  %demodulating the data

[no_of_error(ii),ratio(ii)]=biterr(t_data,demod_Data) ;
end

% plotting the result

semilogy(EbNo,ratio,'--or','linewidth',2);
hold on;
% EbN0Lin = 10.^(EbNo/10);
theoryBer = berfading(EbNo,'psk',2^k,1);
semilogy(EbNo,theoryBer,'--ob','linewidth',2);
legend('simulated','theoritical')
grid on

xlabel('EbNo');
ylabel('BER')
title('Bit error probability curve for 8-PSK using OFDM (Rayleigh Channel)');


Result:
Bit Error Ratio (BER) Curve for 8-PSK (Phase Shift Keying) for Rayleigh Channel

0 comments:

Bit Error Ratio (BER) Curve for 8-PSK (Phase Shift Keying) OFDM for AWGN Channel

%The bit error ratio (also BER) is the number of bit errors divided by the total number of transferred its during a studied time interval. 
%Additive white Gaussian noise (AWGN) is a basic noise model used in Information theory to mimic the effect of many random processes that occur in nature.

MATLAB Code:

close all
clear all
clc

nbitpersym  = 52;     % number of bits per OFDM symbol (same as the number of subcarriers for BPSK)
nsym        = 10^3;    % number of symbols
len_fft     = 64;         % fft size
sub_car     = 52;       % number of data subcarriers
EbNo        = 0:2:12;
k=3;
EsNo= EbNo + 10*log10(52/64)+ 10*log10(64/80) + 10*log10(k); % symbol to noise ratio

snr=EsNo - 10*log10(52/64); % snr as to be used by awgn fn.

hh = modem.pskmod('M',2^k,'InputType','Bit','SymbolOrder','gray'); % modulation object

% Generating data

t_data=randi([0 1],nbitpersym*nsym*k,1);

% modulating data

mod_data = modulate(hh,t_data);

% serial to parallel conversion

par_data = reshape(mod_data,nbitpersym,nsym).';

% pilot insertion

pilot_ins_data=[zeros(nsym,6) par_data(:,[1:nbitpersym/2]) zeros(nsym,1) par_data(:,[nbitpersym/2+1:nbitpersym]) zeros(nsym,5)] ;

% fourier transform time doamain data and normalizing the data

IFFT_data = (64/sqrt(52))*ifft(fftshift(pilot_ins_data.')).';

% addition cyclic prefix

cylic_add_data = [IFFT_data(:,[49:64]) IFFT_data].';

% parallel to serial coversion

ser_data = reshape(cylic_add_data,80*nsym,1);

% passing thru channel

no_of_error=[];
ratio=[];
for ii=1:length(snr)

chan_awgn = sqrt(80/52)*awgn(ser_data,snr(ii),'measured'); % awgn addition

ser_to_para = reshape(chan_awgn,80,nsym).'; % serial to parallel coversion

cyclic_pre_rem = ser_to_para(:,[17:80]);   %cyclic prefix removal

FFT_recdata =(sqrt(52)/64)*fftshift(fft(cyclic_pre_rem.')).';    % freq domain transform

rem_pilot = FFT_recdata (:,[6+[1:nbitpersym/2] 7+[nbitpersym/2+1:nbitpersym] ]); %pilot removal

ser_data_1 = reshape(rem_pilot.',nbitpersym*nsym,1);  % serial coversion

z=modem.pskdemod('M',2^k,'OutputType','Bit','SymbolOrder','gray'); %demodulation object

demod_Data = demodulate(z,ser_data_1);  %demodulating the data

[no_of_error(ii),ratio(ii)]=biterr(t_data,demod_Data) ; % error rate calculation

end

% plotting the result

semilogy(EbNo,ratio,'--or','linewidth',2);
hold on;
theoryBer = berawgn(EbNo,'psk',2^k,'nondiff');
semilogy (EbNo,theoryBer,'--*b','linewidth',2);
legend('simulated','theoritical')
grid on
% axis([0 12 10^-5 .1])
xlabel('EbNo');
ylabel('BER')
title('Bit error probability curve for 8-PSK using OFDM (AWGN)');

Results:
Bit Error Ratio (BER) Curve for 8-PSK (Phase Shift Keying) for Rayleigh Channel

0 comments:

Sending Email thorugh MATLAB

Electronic mail or E-mail is around us since 1993. The pioneer of this mode of communication was no doubt 'Hotmail' which is now owned by Microsoft. From computer based application, they have taken it to web and publicize it to an extent that today the official communication seems incomplete without it. Although the first of the web email was sent through a CERN project.
Sending Email thorugh MATLAB
In this MATLAB code I have used MATLAB JAVA classes to use their SMTP access property. For more about EMAIL and SMTP or other protocols which is used to send mails please refer web.


The MATLAB is commented well, but if you have any doubt please comment below. MATLAB code in bold for better contrast from the comments.

%%MATLAB Code for Sending Email %%

clc;close all;clear all;
mail_to='[email protected]'; %replace with your choice of mail id
%*required

service='gmail';  
%*required
%set service='yahoo' for yahoo.com
%set service='gmail' for gmail.com
%set service='live'  for live.com
%set service='outlook' for outlook.com
%set service='anyother' for anyother.com

ext='.com';
%*required
%set ext='.com' for .com domain
%set ext='.in' for .in domain
%set ext='.co.in' for .co.in domain
%set ext='.mobi' for .mobi domain
%set ext='.xyz' for .xyz domain

user_name='vibhutesh1494'; %replace the string with your user name
%*required

password='xyz'; %replace the string with your password (sender's password)
%*required

subject='Anything you want'; %replace the string with subject of your mail
%if you want subject be blank simply make subject=''

body='Type you email content here'; %replace it with content of your mail
%if you want to send a blank mail simply make body=''

attachment='Provide full path of the file to be attached';
%if you dont want to attach anything simply replace attachment='Path' by attachment=[]

%setting up email server by using java classes
props = java.lang.System.getProperties;
props.setProperty('mail.smtp.auth','true');
props.setProperty('mail.smtp.socketFactory.class', 'javax.net.ssl.SSLSocketFactory');


email_port='465';
%Change this to port 25, 465, 587, 995 based on server properties
%port 25 for smtp
%port 465 for secured/encrypted smtp
%port 587 for TLS enabled servers
%port 995 for SSL/TLS encrypted POP
props.setProperty('mail.smtp.socketFactory.port',email_port);


switch service
    % add in different cases based on server settings
    case 'gmail'
        id = [user_name,'@gmail.com'];
        setpref('Internet','SMTP_Server','smtp.gmail.com');
    case 'live'
        id = [user_name,'@live.com'];
        setpref('Internet','SMTP_Server','smtp.live.com');
    case 'outlook'
        id = [user_name,'@outlook.com'];
        setpref('Internet','SMTP_Server','smtp-mail.outlook.com');
    case 'yahoo'
        id = [user_name,'@yahoo.com'];
        setpref('Internet','SMTP_Server','smtp.mail.yahoo.com');
    otherwise
        id = [user_name,'@',service,'.com'];
        setpref('Internet','SMTP_Server',['smtp.mail.',service,ext]);
end


%for login through your smtp settings
setpref('Internet','E_mail',id);
setpref('Internet','SMTP_Username',id);
setpref('Internet','SMTP_Password',password);

sendmail(mail_to,subject,body,attachment)


NOTE :
*Your mail could end up in SPAM folder particularly if you end up using port 25, so be sure to check this folder too.

*You must be connected to internet for using this code.

*For Gmail it is required to have a secure connection by default. If you get a security certificate error try fiddling up something in your GMAIL account setting to make the mailing transaction unsecured. (At-least for this program).

0 comments:

Installing NS3 in Ubuntu 14.0x : In 5 Simple steps

What is NS-3?
According to its developer's website, the description as follows:
ns-3 is a discrete-event network simulator, targeted primarily for research and educational use. ns-3 is free software, licensed under the GNU GPLv2 license, and is publicly available for research, development, and use.
The goal of the ns-3 project is to develop a preferred, open simulation environment for networking research: it should be aligned with the simulation needs of modern networking research and should encourage community contribution, peer review, and validation of the software.

How to install NS-3 in your Ubuntu 14.0x versions.

Step 1:
You need to install all the dependencies first in order to make your NS-3 work correctly.

In official installation documentation (https://www.nsnam.org/wiki/Installation) the installation process is given step by step, but it will take a long time to complete, instead you can use the following command to complete that 17+ step process in one step process. For other operating system you should look into the above official link. (Since I have tested it for only Ubuntu 14.05 & 14.04 so I can tell you about this only.)

Just copy & paste in the terminal window:

sudo apt-get install gcc g++ python python-dev qt4-dev-tools mercurial bzr gdb valgrind gsl-bin libgsl0-dev libgsl0ldbl flex bison tcpdump sqlite sqlite3 libsqlite3-dev libxml2 libxml2-dev libgtk2.0-0 libgtk2.0-dev uncrustify doxygen graphviz imagemagick texlive texlive-latex-extra texlive-generic-extra texlive-generic-recommended texinfo dia texlive texlive-latex-extra texlive-extra-utils texlive-generic-recommended texi2html python-pygraphviz python-kiwi python-pygoocanvas libgoocanvas-dev python-pygccxml

NOTE: If you are running your Ubuntu in a VM, you need to further install, vtun & lxc. Simply enter the command, sudo apt-get install vtun lxc.

*The above process will take nearly 1200MB of your hard-drive space. So a case might arise that you run out of your space, particularly if you are doing it from a memory limited flash drive.

Step 2:

After finishing with the above step successfully, go to the link: http://www.nsnam.org/release/
To check for the latest  version of NS-3.

In my case it was 3.24, if you want a onder version of NS-3 just note down the version number. 

And enter the following command into your terminal.

   mkdir ns3

   cd ns3
   wget http://www.nsnam.org/release/ns-allinone-3.24.tar.bz2
   tar xjf ns-allinone-3.24.tar.bz2
   cd ns-allinone-3.24/
   ls
 
Before mkdir command make sure you are in right directory( in which you actually want to install, if you are not sure give these command directly, but do remember the path, in my case I have installed it in '/').

After the ls command you are going to see something like this....

bake          constants.pyc  pybindgen-0.17.0.post41+ngd10fa60  util.pyc
build.py      netanim-3.106  README
constants.py  ns-3.24        util.py

Step 3:

After finishing with the above steps, now give the following command:

./build.py --enable-examples --enable-tests

it will take a while to build, once finished goto the ns-3.24 folder. (This folder name Depends upon your NS3 version).

cd ns-3.24

do a ls here
ls

You will see something like this:
AUTHORS          DlRlcStats.txt  scratch          UlRlcStats.txt  waf-tools
bindings         doc             src              utils           wscript
build            examples        test.py          utils.py        wutils.py
CHANGES.html     LICENSE         testpy-output    utils.pyc       wutils.pyc
different.pcap   Makefile        testpy.supp      VERSION
DlMacStats.txt   README          UlMacStats.txt   waf
DlPdcpStats.txt  RELEASE_NOTES   UlPdcpStats.txt  waf.bat

Step 4:

Now we need to build using waf builder. Do the following:

./waf -d debug --enable-examples --enable-tests configure
./waf
 

Step 5:

After done with waf builder. Now its time to check if your installation is ready to work or not? For doing this you need to give the command:

./test.py

If the result is a PASS for all the modules, you are ready with your NS3.


FIRST RUN of NS3:
You might want a first run of NS3 which you have just installed. Just be in the same directory (i.e., ns-3.24, in which the waf & test.py  are) & give the command:

./waf --run first

You will see the output something like this:

Waf: Entering directory `/home/openbts/ns3/ns-allinone-3.24/ns-3.24/build'
Waf: Leaving directory `/home/openbts/ns3/ns-allinone-3.24/ns-3.24/build'
Build commands will be stored in build/compile_commands.json
'build' finished successfully (1.112s)
At time 2s client sent 1024 bytes to 10.1.1.2 port 9
At time 2.00369s server received 1024 bytes from 10.1.1.1 port 49153
At time 2.00369s server sent 1024 bytes to 10.1.1.1 port 49153
At time 2.00737s client received 1024 bytes from 10.1.1.2 port 9

Congrats!


Additionally you should also try: 
./waf --run second
./waf --run third
./waf --run fourth
./waf --run fifth
./waf --run sixth     
./waf --run seventh 


Follow the official tutorial of NS-3 from here:
https://www.nsnam.org/docs/release/3.24/tutorial/ns-3-tutorial.pdf

0 comments:

Calculating the Global Extrema (Minima/Maxima) of a quadratic function/equation through MATLAB

An extrema is a maximum or minimum of a function. An extrema may be local (a.k.a. a relative extrema; an extrema in a given region which is not the overall maximum or minimum) or global. In this MATLAB program we are calculating the global extrema of a quadratic function/equation as entered by the user which is in the form,  'ax^2+bx+c=y'.

The program after getting the values of 'a', 'b' & 'c' from the user plots the function 'y' with the varying value of 'x'. And tells the (x,y) coordinates of the global minimum of that quadratic function.

The value of x & y are actually after taking the derivative of the function  ax^2+bx+c. Refer some mathematics text in order to find more about Maxima & Minima (Extremum) Calculation.

Following MATLAB Code is for Calculating the Global Extrema (Minima/Maxima) of a quadratic function/equation.

%Global extremum of a quadratic function

%input the quadratic equation in terms of 'a','b' & 'c', ax^2+bx+c=y
a=input('Enter a for ax^2+bx+c=y:');
b=input('Enter b for ax^2+bx+c=y:');
c=input('Enter c for ax^2+bx+c=y:');

%for plotting 'y' from x=-200 to +200
xx=-100:1:100;
plot(xx,a.*xx.*xx+b.*xx+c);
title('The plot of User Entered Quadratic Equation/Function')
xlabel('x->>');
ylabel('y->>');

%min/max using first derivative
x = (-b)/(2*a);
y = ((4*a*c)-b^2)/(4*a);
disp('Coordinates of Min/max value (x,y)');
if a>0
    disp('It is a minima.');
else
    disp('It is a maxima.');
end
C = [x,y]

Z = b^2 - 4*a*c;% x-intercepts
A1 = (-b + sqrt(Z))/(2*a);
A2 = (-b - sqrt(Z))/(2*a);

disp('X-Intercepts:');
disp(A1)
disp(A2)


Sample Output:

CASE 1:
Calculating the Global Extrema (Minima/Maxima) of a quadratic function/equation through MATLAB
Enter a for ax^2+bx+c=y:1
Enter b for ax^2+bx+c=y:0
Enter c for ax^2+bx+c=y:0
Coordinates of Min/max value (x,y)
It is a minima.

C =

     0     0

X-Intercepts:
     0

     0


CASE2:
 
Calculating the Global Extrema (Minima/Maxima) of a quadratic function/equation through MATLAB
Enter a for ax^2+bx+c=y:1
Enter b for ax^2+bx+c=y:20
Enter c for ax^2+bx+c=y:1
Coordinates of Min/max value (x,y)
It is a minima.

C =

   -10   -99

X-Intercepts:
   -0.0501

  -19.9499

0 comments:

Convert any of your .m files (MATLAB Script Files) into stand alone applications (.exe) Through mcc: MATLAB Compiler

Yes, you can convert any of your .m files (MATLAB Script Files) into stand alone applications (.exe) using the command "mcc".
"mcc" is the MATLAB command that invokes the MATLAB Compiler. You can issue the "mcc" command either from the MATLAB command prompt (MATLAB mode) or the DOS or UNIX command line (standalone mode). Means it is a separate entity with respect of MATLAB & can be invoked through MATLAB or any other system terminal.

General syntax of "mcc" command is:

mcc [-options] mfile1       [mfile2 ... mfileN]
                            [C/C++file1 ... C/C++fileN] 
 
So, one thing that might come to mind that, what is the benefit of doing it? Well the answer to this is simple, now you can still run your MATLAB Script files without having Matlab installed in your system.

A test case for "mcc".
Suppose you have a MATLAB script file known as xyz.m, that you want to export as an executable. So you will type the command as, "mcc -m calculator.m". You can explore more by typing "help mcc"
The parameter "-m" will generate a  Stand-alone C application, if you want to generate a C++ application you just need to change this parameter as "-p".

Along with the generated .exe (Executable) file mcc will generate some additional files, in the same folder, & they will be like: 
asv file(s)
prg file(s)
c files(s)
log files
txt files

NOTE
You need to have MATLAB Runtime pre-installed in the destination system, in which you planned to deploy this .exe file.

IMPORTANT
MCC (MATLAB Compiler) doesn't generally a part of MATLAB. You need to most probably purchase it as separate entity.

0 comments:

Image stitching Using MATLAB, Joining Multiple Images in MATLAB, Without Correlation: MATLAB Image Processing

The Wikipedia definition says, Image stitching is a process of combining multiple images with some or no overlapping fields of view to produce a segmented panorama or high-resolution image. Commonly performed through the use of computer software, most approaches to image stitching require nearly exact overlaps between images and identical exposures to produce seamless results.

This process can also be easily done in MATLAB, as image is also a matrix of integers & what MATLAB do processing on, is a Matrix. So, image stitching is a simple problem of Matrix Manipulation. If you are aware of these manipulations you can easily get to know how to do it.

NOTE: This method will perform image stitching without correlation of the parts to be stitched, so if there is a overlap between the content of the images to be stitched that will distort the image, as it will contain the repetition of the pixels.

So lets take an Image First. Its my favorite image of Himalaya, as seen from a small & beautiful hill station Ranikhet.
The original or Desired Image, which we have to get after Image Stitching
Now just for the experimentation purpose I have cropped this image in two parts, & will try to stitch those 2 parts (left & right) in order to get the complete panoramic view of Himalaya.

The 2 parts looks like:
(1) Left Part as 1p.jpg in the below MATLAB Codes
Left part of the image to be stitched
(2) Right Part as 1q.jpg in the below MATLAB Codes

Right part of the image to be stitched
Now its time to apply our MATLAB code in order to combine these two images or stitch them to get whatever we wanted it to be.

MATLAB Code, If you wanted to stitch the above two images one over another:

clc
close all
clear all
a= imread('1p.jpg');
%read the left part of the image
b=imread('1q.jpg');  %read the right part of the image
sa= size(a); %get the size of the left image
sb = size(b);%get the size of the left image
b= imresize(b,[sa(1) sa(2)]); %now resize 'b' as per the size of 'a' in order to get perfect sized image
c= [a;b]; % club the image a & b into another new image after making their size same
%note the semicolon in the above line inside bracket
imshow(c) % show the image

The resultant image after applying above MATLAB code is:
The resultant Image After One Over Another image Stiching
The resultant Image After One Over Another image Stitching
NOTE: We have resized image 'b' as per image 'a', you are free to do opposite. This will particularly create visible distortion in the case where there is a large difference in the image size of the combining images.

NOTE: If you want to take image 1p.jpg instead of 1q.jpg to be stitched first, you just need to interchange the variables in the 2nd last line,  that is c= [a;b] to c= [b;a]


MATLAB Code, If you wanted to stitch the above two images sideways:

clc
close all
clear all
a= imread('1p.jpg');
%read the left part of the image
b=imread('1q.jpg');  %read the right part of the image
sa= size(a); %get the size of the left image
sb = size(b);%get the size of the left image
b= imresize(b,[sa(1) sa(2)]); %now resize 'b' as per the size of 'a' in order to get perfect sized image
c= [a b]; % club the image a & b into another new image after making their size same
%note the missing semicolon in the above line inside bracket
imshow(c) % show the image

The resultant image after applying above MATLAB code is:
The stitched version of the above two images Sideways

NOTE: If you want to take image 1p.jpg instead of 1q.jpg to be stitched first, you just need to interchange the variables in the 2nd last line,  that is c= [a b] to c= [b a]


Hope you enjoyed the article on Image Stitching Using Matlab. If you want to share your own result, or want to share your own improved code, just comment over the page or just mail me. I will be happy to include that here.

5 comments:

Making a Versatile Calculator Using MATLAB GUI Programming


Before going through this post I would recommend that you must see, MATLAB GUI basics post so that you can have some idea about the GUI & related options in MATLAB.

Making a Versatile Calculator Using MATLAB GUI Programming


Step 1: Go to MATLAB's command window,  & enter the command
>>guide


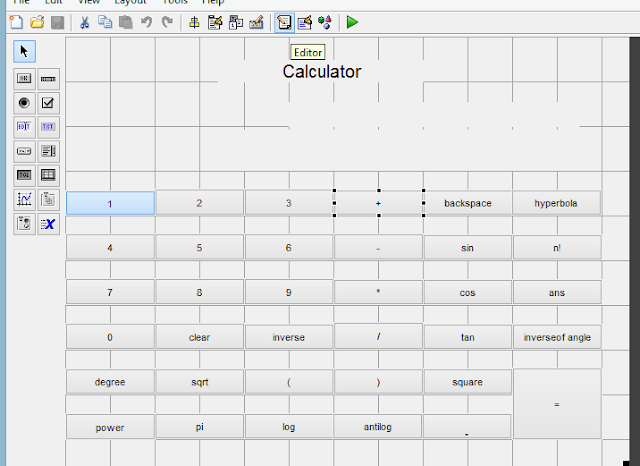
Step2 : Make your GUI platform. Think how your calculator will looks like & add buttons, text box etc. In my calculator I have taken 35 push buttons for different calculator related functions. I take 3 static text box in which one is used for displaying the title of my calculator as “Calculator”. One will show input given by push buttons and last one will be used for showing the results.

Displaying the use of Text Boxes & Buttons in MATLAB GUI


In the property inspector you can change the string name ( which reflects the name of push button ) and tag ( which reflects the name of call back of your push button.

Property Inspector: MATLAB GUI Calculator
 
More options inside Property Inspector: GUI calculator Using MATLAB


So for the '+' push button I changed the string by '+' so at the push button it shows +. And in tag I change with pushbuttonplus so in programming its call back function name is pushbuttonplus. You can give these names as according to your choices.
So the same process I did, with all push buttons. I named all push button tag as per their function which you see in the programming part. Also you can change the colour, font size, size of push button etc things as according to your choice.


Step 3: Once you done all these things you can save this and open the Editor section.

Open the Editor: MATLAB GUI Programming


Step 4: now you have to program each and every button functions as according to your requirement.
In programming there are some functions which is used many times like.
1  #   Set : this is used to set any block when this particular push button calls .
Like: 
Pushbutton1……….
set (handles.text1,’string’,’vijaysharma’);
means whenever pushbutton1 will be called it set text 1 as vijaysharma.
2  #  Get: this is used to take data from any block
New=get( handles.text1.’string’);
means it will take data from text1 and store in New.
#  #  strcat(new,old);
means it add ‘new’ string and ‘old’ string together.
#  #   eval is used to calculate the value of expression given in string.
eval(‘1+2+3*2’);
>> 9
You can read more about these functions in MATLAB.

 
Step5: The programming part: You need to do something like this to get your calculator work!

function varargout = question4(varargin)

gui_Singleton = 1;
gui_State = struct('gui_Name',       mfilename, ...
                   'gui_Singleton',  gui_Singleton, ...
                   'gui_OpeningFcn', @question4_OpeningFcn, ...
                   'gui_OutputFcn',  @question4_OutputFcn, ...
                   'gui_LayoutFcn',  [] , ...
                   'gui_Callback',   []);
if nargin && ischar(varargin{1})
    gui_State.gui_Callback = str2func(varargin{1});
end

if nargout
    [varargout{1:nargout}] = gui_mainfcn(gui_State, varargin{:});
else
    gui_mainfcn(gui_State, varargin{:});
end

function question4_OpeningFcn(hObject, eventdata, handles, varargin)
handles.output = hObject;

% Update handles structure
guidata(hObject, handles);


% --- Outputs from this function are returned to the command line.
function varargout = question4_OutputFcn(hObject, eventdata, handles)

varargout{1} = handles.output;


% --- Executes on button press in pushbutton2.
function pushbutton2_Callback(hObject, eventdata, handles)
old=get(handles.text1,'string');
new=('2');
new1=strcat(old,new);           % add two different strings
set(handles.text1,'string',new1);

% --- Executes on button press in pushbutton3.
function pushbutton3_Callback(hObject, eventdata, handles)
old=get(handles.text1,'string');
new=('3');
new1=strcat(old,new);
set(handles.text1,'string',new1);

% --- Executes on button press in pushbutton4.
function pushbutton4_Callback(hObject, eventdata, handles)
old=get(handles.text1,'string');
new=('4');
new1=strcat(old,new);
set(handles.text1,'string',new1);

% --- Executes on button press in pushbutton5.
function pushbutton5_Callback(hObject, eventdata, handles)
old=get(handles.text1,'string');
new=('5');
new1=strcat(old,new);
set(handles.text1,'string',new1);

% --- Executes on button press in pushbutton6.
function pushbutton6_Callback(hObject, eventdata, handles)
old=get(handles.text1,'string');
new=('6');
new1=strcat(old,new);
set(handles.text1,'string',new1);

% --- Executes on button press in pushbutton7.
function pushbutton7_Callback(hObject, eventdata, handles)
old=get(handles.text1,'string');
new=('7');
new1=strcat(old,new);
set(handles.text1,'string',new1);

% --- Executes on button press in pushbutton8.
function pushbutton8_Callback(hObject, eventdata, handles)
old=get(handles.text1,'string');
new=('8');
new1=strcat(old,new);
set(handles.text1,'string',new1);


% --- Executes on button press in pushbutton9.
function pushbutton9_Callback(hObject, eventdata, handles)
old=get(handles.text1,'string');
new=('9');
new1=strcat(old,new);
set(handles.text1,'string',new1);

% --- Executes on button press in pushbutton10.
function pushbutton10_Callback(hObject, eventdata, handles)
old=get(handles.text1,'string');
new=('0');
new1=strcat(old,new);
set(handles.text1,'string',new1);

% --- Executes on button press in pushbuttonclear.
function pushbuttonclear_Callback(hObject, eventdata, handles)
set(handles.text1,'string', '');    % used for clear the static box with null vector

% --- Executes on button press in pushbutton1.
function pushbutton1_Callback(hObject, eventdata, handles)
old=get(handles.text1,'string');
new=('1');
new1=strcat(old,new);
set(handles.text1,'string',new1);


% --- Executes on button press in pushbuttonminus.
function pushbuttonminus_Callback(hObject, eventdata, handles)
old=get(handles.text1,'string');
new=('-');
new1=strcat(old,new);
set(handles.text1,'string',new1);

% --- Executes on button press in pushbuttonequal.
function pushbuttonequal_Callback(hObject, eventdata, handles)
old=get(handles.text1,'string');
new=eval(old);          % calculate value expression passed in a string
set(handles.text3,'string',new);
set(handles.text1,'string', '');


% --- Executes on button press in pushbuttonplus.
function pushbuttonplus_Callback(hObject, eventdata, handles)
old=get(handles.text1,'string');
new=('+');
new1=strcat(old,new);
set(handles.text1,'string',new1);

% --- Executes on button press in pushbuttonmultiply.
function pushbuttonmultiply_Callback(hObject, eventdata, handles)
old=get(handles.text1,'string');
new=('*');
new1=strcat(old,new);
set(handles.text1,'string',new1);

% --- Executes on button press in pushbuttondivide.
function pushbuttondivide_Callback(hObject, eventdata, handles)
old=get(handles.text1,'string');
new=('/');
new1=strcat(old,new);
set(handles.text1,'string',new1);


% --- Executes on button press in pushbuttondegree.
function pushbuttondegree_Callback(hObject, eventdata, handles)
old=get(handles.text1,'string');
new= char();
for i= 1: (length (old))-1      % combination of both back space and add string so that we can delate bracket of sin and add hyperbola
  new(i)=old(i);
end
new1=('d(');
new2=strcat(new,new1);
set(handles.text1,'string',new2);

% --- Executes on button press in pushbuttonsin.
function pushbuttonsin_Callback(hObject, eventdata, handles)
old=get(handles.text1,'string');
new=('sin(');
new1=strcat(old,new);
set(handles.text1,'string',new1);

% --- Executes on button press in pushbuttoncos.
function pushbuttoncos_Callback(hObject, eventdata, handles)
old=get(handles.text1,'string');
new=('cos(');
new1=strcat(old,new);
set(handles.text1,'string',new1);

% --- Executes on button press in pushbuttontan.
function pushbuttontan_Callback(hObject, eventdata, handles)
old=get(handles.text1,'string');
new=('tan(');
new1=strcat(old,new);
set(handles.text1,'string',new1);

% --- Executes on button press in pushbuttonleftbracket.
function pushbuttonleftbracket_Callback(hObject, eventdata, handles)
old=get(handles.text1,'string');
new=(')');
new1=strcat(old,new);
set(handles.text1,'string',new1);

% --- Executes on button press in pushbuttonrightbracket.
function pushbuttonrightbracket_Callback(hObject, eventdata, handles)
old=get(handles.text1,'string');
new=('(');
new1=strcat(old,new);
set(handles.text1,'string',new1);

% --- Executes on button press in pushbuttonsqurt.
function pushbuttonsqurt_Callback(hObject, eventdata, handles)
old=get(handles.text1,'string');
new=('sqrt(');          % used for square root of any number
new1=strcat(old,new);
set(handles.text1,'string',new1);

% --- Executes on button press in pushbuttonbackspace.
function pushbuttonbackspace_Callback(hObject, eventdata, handles)
old=get(handles.text1,'string');
new= char();
for i= 1: (length (old))-1      % delate last charcter from a string
 
   new(i)=old(i);
end
set(handles.text1,'string',new);

% --- Executes on button press in pushbuttonsquare.
function pushbuttonsquare_Callback(hObject, eventdata, handles)
old=get(handles.text1,'string');
new=('^2');                % power of 2
new1=strcat(old,new);
set(handles.text1,'string',new1);

% --- Executes on button press in pushbuttonpower.
function pushbuttonpower_Callback(hObject, eventdata, handles)
old=get(handles.text1,'string');
new=('^');              % power symbol of any number
new1=strcat(old,new);
set(handles.text1,'string',new1);

% --- Executes on button press in pushbuttonpi.
function pushbuttonpi_Callback(hObject, eventdata, handles)
old=get(handles.text1,'string');
new=('pi');
new1=strcat(old,new);
set(handles.text1,'string',new1);

% --- Executes on button press in pushbuttonlog.
function pushbuttonlog_Callback(hObject, eventdata, handles)
old=get(handles.text1,'string');
new=('log(');           % used for taking log of any number
new1=strcat(old,new);
set(handles.text1,'string',new1);

% --- Executes on button press in pushbuttonantilog.
function pushbuttonantilog_Callback(hObject, eventdata, handles)
old=get(handles.text1,'string');
new=('exp(');               % taking antilog of any number
new1=strcat(old,new);
set(handles.text1,'string',new1);

% --- Executes on button press in pushbuttondot.
function pushbuttondot_Callback(hObject, eventdata, handles)
old=get(handles.text1,'string');
new=('.');
new1=strcat(old,new);
set(handles.text1,'string',new1);


% --- Executes on button press in pushbuttonhyperbola.
function pushbuttonhyperbola_Callback(hObject, eventdata, handles)
old=get(handles.text1,'string');
new= char();
for i= 1: (length (old))-1      % combination of both back space and add string so that we can delate bracket of sin and add hyperbola
  new(i)=old(i);
end
new1=('h(');
new2=strcat(new,new1);
set(handles.text1,'string',new2);


% --- Executes on button press in pushbuttoninverse.
function pushbuttoninverse_Callback(hObject, eventdata, handles)
old=get(handles.text1,'string');
new=('inv(');           % used for inverse of any number
new1=strcat(old,new);
set(handles.text1,'string',new1);


% --- Executes on button press in pushbuttonfactorail.
function pushbuttonfactorail_Callback(hObject, eventdata, handles)
old=get(handles.text1,'string');
new=('factorial(');     % used for factroial of any number
new1=strcat(old,new);
set(handles.text1,'string',new1);


% --- Executes on button press in pushbuttonans.
function pushbuttonans_Callback(hObject, eventdata, handles)
old=get(handles.text3,'string');        % taking result from output box and put on input box
new=get(handles.text1,'string');
new1=strcat(new,old);
set(handles.text1,'string',new1);


% --- Executes on button press in pushbuttoninversetran.
function pushbuttoninversetran_Callback(hObject, eventdata, handles)
old=get(handles.text1,'string');
new=('a');
new1=strcat(new,old);
set(handles.text1,'string',new1);


Step 6: Now execute it. 

 
MATLAB GUI Calculator
 

After that you can make your .exe file of this program by the help of command ‘deploytool’. Just type this command on command window and add the file of program and build it.
 
You can add extra function add according to your requirement.
If you have any suggestion or fault in this let me know, in the comment section or just drop a mail.


0 comments: