Frequency Shift Keying (FSK) Digital Modulation MATLAB Simulation, With MATLAB Code

Defining FSK (Frequency Shift Keying):
Frequency-shift keying (FSK) is a frequency modulation scheme in which digital information is transmitted through carrier frequency. The simplest FSK is binary FSK (BFSK). BFSK uses a pair of discrete frequencies to transmit binary (0s and 1s) information. If the number of symbols to transmit is more than 2, so we will just have to use as many carriers as the number of symbols.

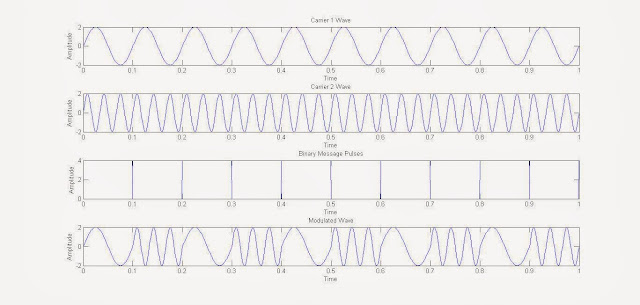
The given example of MATLAB Simulation of Frequency Shift Keying (FSK), the user is asked about the frequency of the two carrier wavea, Message periodic pulse & the Amplitude of the waves (considering for square message wave & both carrier wave have equal amplitude). The frequency of the carrier wave will change from f1 to f2 or vice versa whenever a zero is changed to 1 or vice-verso. The frequency will not change if in 2 successive time period there is no change in message bit value.
The MATLAB below code lets the user to plot 4 graphs, namely 2 graph plot of The Carrier Waves (Sinusoid), The Binary Message Pulse & The Modulated Wave.

MATLAB Code FOR FSK (Frequency Shift Keying) BFSK in this case:

clc %for clearing the command window
close all
%for closing all the window except command window
clear all
%for deleting all the variables from the memory
fc1=input('Enter the freq of 1st Sine Wave carrier:');
fc2=input('Enter the freq of 2nd Sine Wave carrier:');
fp=input('Enter the freq of Periodic Binary pulse (Message):');
amp=input('Enter the amplitude (For Both Carrier & Binary Pulse Message):');
amp=amp/2;
t=0:0.001:1;
% For setting the sampling interval
c1=amp.*sin(2*pi*fc1*t);
% For Generating 1st Carrier Sine wave
c2=amp.*sin(2*pi*fc2*t);
% For Generating 2nd Carrier Sine wave
subplot(4,1,1);
%For Plotting The Carrier wave
plot(t,c1)
xlabel('Time')
ylabel('Amplitude')
title('Carrier 1 Wave')
subplot(4,1,2)
%For Plotting The Carrier wave
plot(t,c2)
xlabel('Time')
ylabel('Amplitude')
title('Carrier 2 Wave')
m=amp.*square(2*pi*fp*t)+amp;
%For Generating Square wave message
subplot(4,1,3)
%For Plotting The Square Binary Pulse (Message)
plot(t,m)
xlabel('Time')
ylabel('Amplitude')
title('Binary Message Pulses')
for i=0:1000
%here we are generating the modulated wave
    if m(i+1)==0
        mm(i+1)=c2(i+1);
        else
        mm(i+1)=c1(i+1);
    end
end
subplot(4,1,4)
%For Plotting The Modulated wave
plot(t,mm)
xlabel('Time')
ylabel('Amplitude')
title('Modulated Wave')

The following INPUTS GIVEN TO GENERATE FSK MODULATED WAVE:
Enter the freq of 1st Sine Wave carrier:10
Enter the freq of 2nd Sine Wave carrier:30
Enter the freq of Periodic Binary pulse (Message):5
Enter the amplitude (For Both Carrier & Binary Pulse Message):4
Result:
Frequency Shift Keying (FSK) Digital Modulation MATLAB Simulation, With MATLAB Code
Frequency Shift Keying (FSK) Digital Modulation MATLAB Simulation
Read MORE:

0 comments:

Matlab Christmas Tree Plot- Christmas celebration through matlab way - Merry Christmas!

So it Christmas time!
And you know one thing? Our favorite software MATLAB is good for every festival/season/celebration & so versatile that you can do infinite things with it. And if you want to give your techie friend a Christmas greeting in a different way, you may want to try the below the 2 links. He/She will be glad to see the results! Trust us & try!

1st code link:
https://uk.mathworks.com/matlabcentral/mlc-downloads/downloads/submissions/22478/versions/1/download/zip
Just open the zip file, and extract the .m  file from it. Copy it to the current working directory, or change it to the extracted directory! And run!
So what he above code will do?


Here is the result of that...
Matlab Christmas Tree Plot- Merry Christmas- Christmas celebration through matlab way!
What you have just seen? A figure window opened, and that too with a Christmas Tree, Fully Decorated!


2nd Code Link:
https://uk.mathworks.com/matlabcentral/fileexchange/9337-xmas-tree

Just run the downloaded .m file, & what you will see is....
A 3D Plot of another beautiful Christmas Tree, fully decorated! Choose PAN & ROTATE3D  button from the toolbar in the figure window, to see in it differnt angles!
Here is how it looks...

Matlab Christmas Tree Plot- Merry Christmas- Christmas celebration through matlab way

Additional MATLAB related Posts That You May Like!

# Implementation of RSA Cryptography Algorithm Using MATLAB Code
# Recording a Video From Webcam Using MATLAB Code 

# Accessing the Serial Port using MATLAB Code: Serial communication through MATLAB
# Accessing Webcam Through MATLAB Code
# Motion Tracking/Detection in MATLAB using Kalman Filter
# Optimizing MATLAB Code
# Controlling Mouse Pointer/Cursor Using MATLAB Code
# Controlling Keyboard Keys (Pressing & Releasing) with Matlab code 
# Starting MATLAB without GUI through Command Prompt/LxTERMINAL
# Some MATLAB Unusual Commands, That You Must Know ( Just For Fun! ) Part 2
# Some MATLAB Unusual Commands, That You Must Know ( Just For Fun! ) Part 1 


0 comments:

Binary Phase Shift Keying (BPSK) Modulation MATLAB Simulation, With MATLAB Code

So what is PSK (Phase Shift Keying)?
Phase-shift keying (PSK) is a digital modulation technique that projects data by modulating, the phase of a reference signal (the carrier wave).
Any digital modulation scheme uses a finite number of distinct signals to represent digital data. PSK uses a finite number of phases, each assigned a unique pattern of binary digits. Usually, each phase encodes an equal number of bits. Each pattern of bits forms the symbol that is represented by the particular phase. The demodulator, which is designed specifically for the symbol-set used by the modulator, determines the phase of the received signal and maps it back to the symbol it represents, thus recovering the original data.
In the example MATLAB Simulation of Phase Shift Keying (PSK), the user is asked about the frequency of the carrier wave, Message periodic pulse & the Amplitude of the waves (considering both square message wave & carrier wave have equal amplitude). The phase of the carrier wave will change by 180 degree whenever a zero is changed to 1 or vice-verso. The phase will not change if in 2 successive time period there is no change in message bit value.
The MATLAB code lets the user to plot 3 graphs, namely of The Carrier Wave (Sinusoid), The Binary Message Pulse & The Phase Shift Keyed Wave.
MATLAB Code FOR PSK (Phase Shift Keying) :

clc %for clearing the command window
close all
%for closing all the window except command window
clear all
%for deleting all the variables from the memory
t=0:.001:1;
% For setting the sampling interval
fc=input('Enter frequency of Carrier Sine wave: ');
fm=input('Enter Message frequency : ');
amp=input('Enter Carrier & Message Amplitude(Assuming Both Equal):');
c=amp.*sin(2*pi*fc*t);
% Generating Carrier Sine
subplot(3,1,1)
%For Plotting The Carrier wave
plot(t,c)
xlabel('Time')
ylabel('Amplitude')
title('Carrier')
m=square(2*pi*fm*t);
% For Plotting Message signal
subplot(3,1,2)
plot(t,m)
xlabel('time')
ylabel('ampmplitude')
title('Message Signal')
% Sine wave multiplied with square wave in order to generate PSK
x=c.*m;
subplot(3,1,3)
% For Plotting PSK (Phase Shift Keyed) signal
plot(t,x)
xlabel('t')
ylabel('y')
title('PSK')


NOTE: Use Semicolon ';' in order to suppress the output from coming to the MATLAB's Command Window, whenever declaring a periodic pulse, as it can display a vary large matrix in the output, so you can miss what you want.

INPUTS GIVEN TO GENERATE ASK MODULATED WAVE:
Enter frequency of Carrier Sine wave: 60
Enter Message frequency : 10
Enter The Carrier & Message Amplitude(Assuming Both Equal): 3
 
RESULT:
Resultant Graph Of PSK Modulation (Phase Shift Keying) In MATLAB

5 comments:

Amplitude Shift Keying (ASK) Modulation MATLAB Simulation, With MATLAB Code

So what is ASK or Amplitude Shift Keying?
Amplitude-shift keying (ASK) is a form of amplitude modulation (AM) that projects a digital data as variations in the amplitude of a carrier wave (Which is particularly a High Frequency Sinusoidal wave). In an ASK system ,binary symbol 1 is represented by transmitting carrier wave of fixed amplitude and fixed frequency for the bit duration T second, the binary symbol 0 will be represented by not transmitting any wave for another bit duration T seconds.

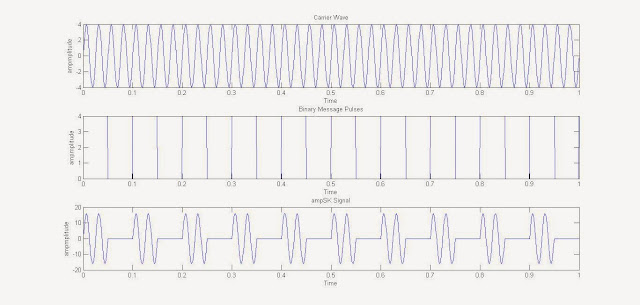
In the example MATLAB Simulation of Amplitude Shift Keying (ASK), the user is asked about the frequency of the carrier wave, binary message periodic pulse & the amplitude of the waves (considering both square message wave & carrier wave have equal amplitude).

The MATLAB code lets the user to plot 3 graphs, namely of The Carrier Wave (Sinusoid), The Binary Message Pulse & The Amplitude Shift Keyed Wave.

MATLAB Code FOR ASK (Amplitude Shift Keying) :

clc %for clearing the command window
close all
%for closing all the window except command window
clear all
%for deleting all the variables from the memory
fc=input('Enter the freq of Sine Wave carrier:');
fp=input('Enter the freq of Periodic Binary pulse (Message):');
amp=input('Enter the amplitude (For Carrier & Binary Pulse Message):');
t=0:0.001:1;
% For setting the sampling interval
c=amp.*sin(2*pi*fc*t);
% For Generating Carrier Sine wave
subplot(3,1,1)
%For Plotting The Carrier wave
plot(t,c)
xlabel('Time')
ylabel('Amplitude')
title('Carrier Wave')
m=amp/2.*square(2*pi*fp*t)+(amp/2);
%For Generating Square wave message
subplot(3,1,2)
%For Plotting The Square Binary Pulse (Message)
plot(t,m)
xlabel('Time')
ylabel('Amplitude')
title('Binary Message Pulses')
w=c.*m;
% The Shift Keyed Wave
subplot(3,1,3)
%For Plotting The Amplitude Shift Keyed Wave
plot(t,w)
xlabel('Time')
ylabel('Amplitude')
title('Amplitide Shift Keyed Signal')


NOTE: Use Semicolon ';' in order to suppress the output from coming to the MATLAB's Command Window, whenever declaring a periodic pulse, as it can display a vary large matrix in the output, so you can miss what you want.


INPUTS GIVEN TO GENERATE ASK MODULATED WAVE:
Enter the freq of Sine Wave carrier:100
Enter the freq of Periodic Binary pulse (Message):10
Enter the amplitude (For Both Carrier & Binary Pulse Message):4

RESULT:

Resultant Graph Of ASK Modulation (Amplitude Shift Keying) In MATLAB

0 comments:

Using MATLAB, Extracting individual Red, Blue & Green (RGB) planes, From a RGB Image, With Code

Extraction of individual Red, Green & Blue from a RGB image is a simple task, just follow these steps if you are new to this process:

1. Suppose we are having an image known as 'xyz.jpg', which is a RGB image.

Now we are going to read that image in MATLAB, by using the command (if the image is in current working directory), imread('xyz.jpg'); or if the image is stored in other folder simply we have to provide the path of that image including the image.

Suppose the path of the image is 'E:\bunty\xyz.jpg' so we have to write like this imread('E:\bunty\xyz.jpg');.

Always prefer to create an exclusive variable for an image, for example here it will be x, x=imread('xyz.jpg');  The creation of a dedicated variable makes it easy to operate anything.
NOTE: Use ';' (Semicolon) to supress the output other wise you will see a large matrix of integers in front of you in the command window!
2. Now use the command imshow(x), in order to view the image just loaded as variable x.

3. Extraction of red (R) plane: We will be storing the red plane of the RGB image in the variable 'xR'. Therefore the command will be xR=x(:,:,1);, now you can use imshow(xR) in order to see the red plane of the RGB image.

4.  Extraction of green (G) plane: We will be storing the green plane of the RGB image in the variable 'xG'. Therefore the command will be xG=x(:,:,2);, now you can use imshow(xG) in order to see the green plane of the RGB image.

5.  Extraction of blue (B) plane: We will be storing the blue plane of the RGB image in the variable 'xB'. Therefore the command will be xB=x(:,:,3);, now you can use imshow(xB) in order to see the blue plane of the RGB image.

So the complete code will be like:
clc;
clear all;
close all;
x=imread('xyz.jpg');
figure, imshow(x);
title('Original RGB Image');
xR=x(:,:,1);
figure, imshow(xR);
title('Red Plane of RGB image');
xG=x(:,:,2);
figure, imshow(xG)
title('Green Plane of RGB image');
xB=x(:,:,3);
figure, imshow(xB)
title('Blue Plane of RGB image');


Snapshots:
Original RGB Image (Using MATLAB, Extracting individual Red, Blue & Green (RGB) planes, From a RGB Image)
Original RGB Image
Blue Plane OF RGB Image(Using MATLAB, Extracting individual Red, Blue & Green (RGB) planes, From a RGB Image)
Blue Plane OF RGB Image

Green Plane OF RGB Image(Using MATLAB, Extracting individual Red, Blue & Green (RGB) planes, From a RGB Image)
Green Plane OF RGB Image

Red Plane OF RGB Image(Using MATLAB, Extracting individual Red, Blue & Green (RGB) planes, From a RGB Image)
Red Plane OF RGB Image

3 comments:

Create A Video File From A Sequence Of Image Stored in a Folder, Using MATLAB

In the recent article we have given the introduction of How to Extract Frames Using MATLAB code, now its time to look at the reverse process. That is, how to convert those frames or a sequence of images back into the video file. And all that with MATLAB coding. If you intend to apply this code in your system, then you need to understand the code, so read below carefully.

Code for that:

ImFolder=uigetdir;
pngFile = dir(strcat(ImFolder,'\*.png'));
S = [pngFile(:).datenum];
[S,S] = sort(S);
pngFiles = pngFile(S);
VideoFile=strcat(ImFolder,'\Video');
writeObj = VideoWriter(VideoFile);
fps= 15;
writeObj.FrameRate = fps;
open(writeObj);
for t= 1:length(pngFiles)
     Frame=imread(strcat(ImFolder,'\',pngFiles(t).name));
     writeVideo(writeObj,im2frame(Frame));
end
close(writerObj);

Explanation of the above code: 

ImFolder=uigetdir;  --> This line when executed, will open a browse window in which you can select your desired folder, where the frames or sequence of images is. The path will be stored in the variable ImFolder.

# pngFile = dir(strcat(ImFolder,'\*.png')); --> here the variable pngFile will be a structure that contain all the names of PNG files that are in the directory you have specified. If your image files are in jpeg format, so give the above command as dir(strcat(ImFolder,'\*.jpg')). Here '\*.png' will be acting as a wildcard for all the PNG files available in that folder.

# S = [pngFile(:).datenum];
[S,S] = sort(S);
--> This 2 lines of code will sort the files according to the datenum property of the pngFile structure.

# pngFiles = pngFile(S); --> creating another variable pngFiles same as pngFile , but the former contains the files list in sorted form.

# VideoFile=strcat(ImFolder,'\Video'); --> Creating a Video File name as Video

# writeObj = VideoWriter(VideoFile); --> This will create a Video Object named writeObj.

# fps= 15; --> specifying the frame rate as 15 (or whatever is required or whatever you want). Your video file length will be decided by the value of fps and the number of the image files.

# writeObj.FrameRate = fps; -->  we have set the FrameRate property of writeObj  video object as specified in the variable fps.

#  open(writeObj); --> Open to start writing the frames in the writeObj video object.

# for t= 1:length(pngFiles)
     Frame=imread(strcat(ImFolder,'\',pngFiles(t).name));
     writeVideo(writeObj,im2frame(Frame));
end
--> These 4 lines will write the frames in the newly created video file, that is initially empty.
# close(writeObj); --> close the writeObj to complete the video write process.


After this line of code's execution a video file will be created the the root folder with the name Video.avi or what ever you have specified.


Screenshots:
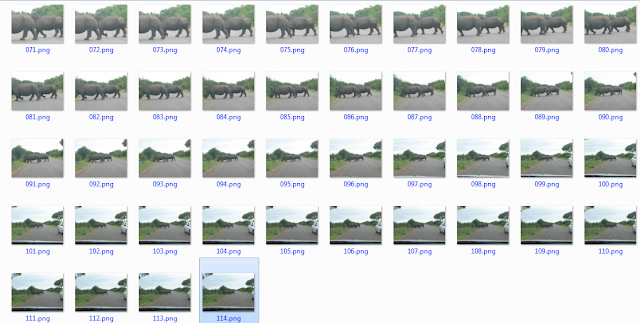
Initial Frame Sequence, that we have, before applying this code on this folder, Create A Video File From A Sequence Of Image, Using MATLAB
Initial Frame Sequence, that we have, before applying this code on this folder

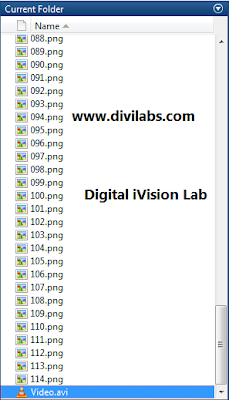
The working directory indicating the frames along with the output video file, Create A Video File From A Sequence Of Image Stored in a Folder, Using MATLAB
The working directory indicating the frames along with the output video file

Create A Video File From A Sequence Of Image Stored in a Folder, Using MATLAB,The output video file along with the frames,
The output video file along with the frames,


The main idea behind the code was obtained from the blog below (We adapted it for Our need though!), it does has various topics about image processing, do refer it:

1 comments:

Using 7805 (78xx) As a Fixed & Variable Voltage Regulator


A voltage regulator is designed for automatic maintenance of a constant voltage level . It can be an AC voltage regulator or DC . Regulation can be achieved by electro mechanical equipments or electronics components
 
7805 is the most famous and common voltage regulator which belongs to the family of  78xx series (Other commonly used members of the Family are 7805,7806,7808,7810,7812,7815, 7818, 7824).

NOTE:
xx in 78xx family tell about the output voltage on providing certain amount of input voltage
This voltage regulator(7805) is mainly used to regulate the voltage to 5V


Part No.           Number Output Voltage (V)        Minimum Input Voltage (V)
7805 +5           7.3
7806 +6        8.3
7808 +8        10.5
7810 +10        12.5
7812 +12        14.6
7815 +15        17.7
7818 +18        21.0
7824 +24        27.1


And in case that you haven't provided the Minimum Input Voltage, it is not true that it will not work but the output voltage will be reduce. 

Pin configuration

Pin Configuration Of IC 7805, The Voltage regulator
If you hold the Ic in your hand with the flat surface on the back side
The 1st pin from the left is the input pin, 2nd or the middle pin is the common (COM) or ground (GND) & the 3rd pin is the output pin.


Let us see how to use 7805 in circuits (As a constant Voltage Regulator)

So for a 7805 who will generate 5 volts you need a source which generates at least 7 volts (7.3 to be more precise) & can be fed as input to 7805.

As you can see in the figure below  positive of the battery source is connected to the input pin of 7805 & the output or the third pin is connected to the positive of the diode via a resistor and the ground pin is common for both.

NOTE :

An amazing thing about 7805 is that if you need -5 volts from this IC (7805) all you need to do is to interchange output and the ground pins across the load. Just like you do in a battery.
In the circuit below we will need the resistor R1  to be connected across the LED in series, other wise there will be high chances that will will blow off your LED.
IC 7805 in Action, As a Voltage Regulator


At many places(books/websites) you would have seen these kind of images (given just Below) and wondered what it is?  
It is the same thing as was shown in the above circuit diagram, the only difference is the capacitors and these are only to reduce the ripples if any are present since not every voltage source will hold a constant amplitude.


78XX as a variable voltage regulator

You might have thought can 78xx IC act as a variable voltage regulator, yes 78xx series can also act as a variable voltage regulator where the voltage at the output can be varied depending on the requirements of the circuit, by just varying the value of one of the resistor in the circuit.

Let us see how

78XX as a variable voltage regulator


By using this formula(given Below) you can find the value of output voltage.

Formula for output voltage of voltage regulator action in variable voltage regulator
Thus, by varying the value of R2 the output voltage can be affected. And the above circuit will act as a variable voltage regulator.
Note:- Vxx is the nominal output voltage (output to common) of the fixed regulator   

There are few advantages of these regulators


  • # 78xx series ICs do not require additional component to provide a constant, regulated source of power, and are really easy to use.
  • # 78xx series ICs have built-in protection against a circuit drawing too much power.
  • # They have protection against overheating and short-circuits.
  • # In some cases, the current-limiting features of the 78xx devices can provide protection not only for the 78xx itself, but also for other parts of the circuit.
  • # And the best part is they don’t really cost much..!! They are quiet inexpensive

There are few disadvantages to these voltage regulator

# The input voltage must be always slightly greater than 5 volts
# They are linear regulators input current required is always the same as the output current
# These types of voltage regulator dissipates a lot of heat therefore a heat sink is suggested in case you are working with higher voltage like 20 volts or so but even with 12 volts of input they generate decent amount of heat.
Author: Rahul Kumar, VIT University

0 comments: